Saturday, January 25, 2025

Free pallet shed designs for maximizing backyard space

Free Pallet Shed Designs for Maximizing Backyard Space

The judicious use of reclaimed materials offers a sustainable and economical approach to backyard organization. Pallet wood, readily available and often free for the taking, presents a unique opportunity for constructing practical and aesthetically pleasing storage solutions. This article explores various free pallet shed designs optimized for maximizing backyard space, addressing design considerations, construction techniques, and aesthetic enhancements.

Understanding Space Optimization in Backyard Shed Design

Before embarking on the construction of a pallet shed, a thorough assessment of the available backyard space is paramount. Consider the following factors:

Site Selection and Dimensions

The chosen location should be level, accessible, and provide sufficient sunlight and ventilation. Carefully measure the area to determine the maximum dimensions of the shed that can be accommodated without impeding movement or obstructing other features. Consider proximity to existing structures and utilities. Smaller sheds, even as diminutive as 3' x 4', can surprisingly accommodate a great deal of storage if thoughtfully designed.

Orientation and Access

The shed's orientation should maximize natural light and minimize exposure to prevailing winds and rain. Ensure easy access to the shed from a convenient pathway or existing access point. Proper orientation can also significantly impact internal temperature regulation, reducing the need for supplemental climate control measures.

Integration with Existing Landscaping

The design should complement the existing landscaping and architectural style of the house and other structures. Careful integration minimizes visual clutter and enhances the overall aesthetic appeal of the backyard. Consider using climbing plants or other landscaping elements to soften the shed's appearance and integrate it more seamlessly into the surroundings.

Free Pallet Shed Design Options: A Range of Styles and Sizes

Numerous pallet shed designs can be adapted to maximize space within a limited area. The following examples illustrate the diversity of achievable outcomes, catering to a range of needs and aesthetic preferences:

The Lean-To Shed

This design, characterized by its simplicity and compact footprint, is ideal for small backyards. A lean-to shed is built against an existing wall or fence, effectively utilizing otherwise wasted space. Its construction typically involves a sloping roof supported by a single wall and a series of sturdy posts or beams. The minimalist design is easy to construct, requiring less material and effort.

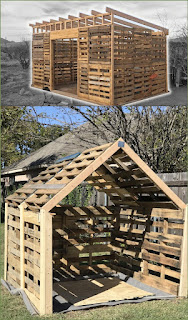
The Small Square Shed

A small square or rectangular shed (e.g., 4' x 4' or 5' x 5') offers greater storage capacity than a lean-to. This design allows for more internal organization with shelves and compartments. Construction involves building a basic frame and covering it with reclaimed pallet wood. Adding a small door and a pitched or flat roof completes the structure. A simple foundation of concrete pavers or gravel is sufficient.

The Multi-Purpose Pallet Garden Shed

This design combines storage with functionality. A portion of the shed can be dedicated to gardening supplies, while the remaining space houses tools and other equipment. The inclusion of small, well-placed windows ensures adequate ventilation and prevents excessive moisture buildup within the shed. Shelves and integrated hooks maximize vertical space.

The Elevated Pallet Shed

An elevated shed maximizes usable space beneath the structure. This space can be used for storage of less frequently used items or tools. Constructing the elevated base requires additional materials and planning. However, the resulting increased storage capacity is significant, especially in smaller backyards.

Construction Techniques and Material Considerations

Successfully building a pallet shed necessitates careful planning and execution. The following points are critical:

Pallet Selection and Preparation

Source high-quality pallets. Not all pallets are created equal; prioritize those constructed from pressure-treated lumber or sturdy hardwood. Inspect pallets carefully for rot, damage, or infestation before use. Thoroughly clean and sand the wood to remove debris and splinters, ensuring a safe and aesthetically pleasing final product. Disassemble pallets carefully to salvage usable boards.

Foundation and Framing

A stable foundation is essential. A simple concrete slab, gravel base, or even a raised platform of treated lumber can serve as a suitable foundation. The frame, constructed from sturdy lumber or reclaimed pallet wood, provides the structural support for the shed's walls and roof. Ensure all joints are securely fastened with appropriate screws or nails.

Roofing and Siding

The roofing material should be durable and weather-resistant. Consider using salvaged corrugated metal, asphalt shingles, or even recycled plastic sheeting. The siding can be made entirely from the prepared pallet wood, arranged in a visually appealing manner. Ensure proper overlap and sealing to prevent moisture penetration.

Doors and Windows

Pallet wood can also be utilized to construct simple doors and windows. Consider the use of hinges, latches, and window panes for enhanced functionality and security. Alternative options include repurposing salvaged doors and windows.

Finishing Touches

After construction, apply a suitable sealant or weatherproof paint to protect the wood from the elements and enhance its longevity. Consider adding decorative elements such as landscaping or lighting to integrate the shed seamlessly into the backyard.

Safety Precautions During Construction

Safety should be a paramount concern throughout the construction process. Always wear appropriate safety gear, including gloves, eye protection, and a dust mask. Use caution when handling power tools and ensure proper ventilation when working with paints or sealants. Always follow appropriate building codes and regulations.

Conclusion

Constructing a free pallet shed offers a resourceful and environmentally conscious approach to enhancing backyard space. By carefully planning the design, selecting appropriate materials, and following safe construction practices, homeowners can create functional and aesthetically pleasing structures that maximize storage capacity while minimizing environmental impact. The numerous design variations presented offer a customizable solution for a range of needs and preferences. Remember that careful planning and attention to detail are crucial in ensuring a successful and rewarding project.

Continue reading

Friday, January 24, 2025

Lean to shed designs for outdoor tool and equipment storage

Lean-To Sheds: Your Perfect Outdoor Storage Solution

So, you're looking for a way to organize your outdoor tools and equipment? Tired of that jumbled mess in the garage or that constantly-growing pile in the backyard? A lean-to shed might be the perfect solution! They're surprisingly versatile, relatively inexpensive to build, and can be customized to fit your specific needs. Let's dive into the world of lean-to sheds and explore why they're a great choice for your outdoor storage.

What Exactly *Is* a Lean-To Shed?

Imagine a shed that's, well, leaning! A lean-to shed is essentially a single-sloped roof structure attached to an existing wall â€" a house, a barn, a garage, even a sturdy fence. It’s simpler to build than a freestanding shed, making it a popular DIY project. The “lean” part refers to how the roof slopes towards the ground, usually relying on the existing wall for support. This design is both cost-effective and space-saving, especially if you're short on land.

Why Choose a Lean-To Shed for Your Tools and Equipment?

There are tons of reasons why lean-to sheds are ideal for outdoor storage. Let's break down a few key benefits:

Cost-Effectiveness:

Lean-to sheds are generally much cheaper than freestanding sheds. Since they use an existing wall for support, you're saving on materials and labor for at least one side of the structure. This makes them a fantastic budget-friendly option, perfect for those on a tighter budget.

Space-Saving Design:

If you have limited space in your yard, a lean-to shed is perfect. It utilizes existing wall space, minimizing the footprint compared to a freestanding shed. This is particularly helpful for smaller yards or properties where space is at a premium.

Easy DIY Project:

Many lean-to sheds are relatively straightforward to construct, making them a great DIY project for those with some basic carpentry skills. Plenty of plans and tutorials are available online, guiding you through each step of the process. Of course, if DIY isn't your thing, you can always hire a contractor.

Customizability:

While the basic design is simple, you have a lot of room for customization. You can choose the size, materials (wood, metal, etc.), roofing, and even add features like windows or doors to suit your needs. Need extra ventilation? No problem! Want a specific style to match your house? Absolutely!

Protection from the Elements:

This is the main reason most people build them! A lean-to provides shelter for your tools and equipment, safeguarding them from rain, snow, sun, and other elements. This helps extend the lifespan of your valuable possessions.

Planning Your Lean-To Shed: Size and Materials

Before you grab your hammer, it's crucial to plan out your lean-to shed. Consider these factors:

Size:

How much storage space do you actually need? Measure your tools and equipment to determine the minimum size required. Don't forget to account for walkways and comfortable access to your belongings. A slightly larger shed is better than one that's cramped and difficult to use.

Materials:

The materials you choose will impact the cost, durability, and aesthetic of your shed. Wood is a popular choice, offering a classic look and relative ease of construction. Metal is a more durable and weather-resistant option, though it can be more challenging to work with. Consider your budget and skill level when making your decision. You can even mix and match â€" for example, a wood frame with a metal roof.

Roofing:

The roof is crucial for protection. Asphalt shingles are a common and affordable choice, but you could also opt for metal roofing for added durability and longevity. Think about your local climate; a heavier-duty roof might be necessary in areas with heavy snowfall.

Foundation:

A proper foundation is essential for stability. While some lean-to sheds can be built directly on a compacted gravel base, a more substantial foundation (concrete slab or pier footings) is often recommended, especially for larger sheds or those in areas with shifting soil.

Building Your Lean-To Shed: A Step-by-Step Overview (Simplified!)

Building a lean-to shed is a project that can be broken down into manageable steps. While a detailed explanation would require a whole book, here's a simplified overview:

  1. Planning and Design: Draw up plans, including dimensions, materials, and foundation type. Obtain necessary permits if required by your local regulations.
  2. Foundation Preparation: Prepare the ground, level it, and pour a concrete slab or install pier footings, as needed.
  3. Framing: Construct the frame of your shed using your chosen materials. This includes the walls and roof supports.
  4. Sheathing: Attach sheathing (plywood or other material) to the frame for a solid surface.
  5. Roofing: Install your chosen roofing material.
  6. Finishing Touches: Add doors, windows, and any other desired features. Paint or stain the shed to protect the wood and enhance its appearance.

Remember: Safety first! Always wear appropriate safety gear (gloves, safety glasses, etc.), and follow all building codes and regulations.

Frequently Asked Questions

Here are some frequently asked questions about lean-to sheds:

Q: Do I need a permit to build a lean-to shed?

A: This depends on your local building codes. Check with your local municipality to determine if a permit is required based on the size and location of your shed.

Q: How long does it take to build a lean-to shed?

A: This varies greatly depending on the size, complexity, and your experience level. A simple shed could take a weekend, while a more complex one might take several weeks.

Q: Can I use a lean-to shed for anything besides tools?

A: Absolutely! They’re great for storing gardening supplies, bicycles, firewood, outdoor furniture, or even as a simple workshop.

Q: How do I insulate a lean-to shed?

A: You can add insulation between the studs of the walls and roof, using appropriate materials for exterior applications. This can improve the temperature regulation inside the shed.

Q: What are some common mistakes to avoid when building a lean-to shed?

A: Common mistakes include improper foundation preparation, inadequate framing, and neglecting proper weatherproofing. Careful planning and attention to detail are crucial.

Building a lean-to shed can be a rewarding project that provides valuable outdoor storage. By carefully planning and following safe building practices, you can create a customized space to organize your tools and equipment effectively. Remember to check local regulations and enjoy the process!

Continue reading

DIY garden shed projects for creating a garden potting shed

DIY Garden Shed Projects: Your Dream Potting Shed Awaits!

Hey there, fellow gardening enthusiasts! So, you're dreaming of a dedicated potting shed â€" a haven for all your gardening goodies, right? Forget those expensive pre-fab sheds! Let's dive into the wonderful world of DIY garden shed projects and build your own personalized potting paradise. I'm going to walk you through some amazing ideas, from simple to more ambitious, so you can find the perfect project to match your skills and budget. Grab your tool belt and let's get started!

Choosing Your Shed Style: From Simple to Spectacular

The first step is deciding what kind of potting shed you envision. Do you want something small and sweet, or a larger, more elaborate structure? Think about the space you have available, your budget, and your DIY skills.

The Pallet Paradise: A Budget-Friendly Option

For a super affordable and surprisingly charming option, consider building a shed from reclaimed pallets. This is a fantastic beginner-friendly project. You'll need to source pallets (check local builders or ask around â€" often they're free!), clean them thoroughly, and then carefully construct your shed. You can leave the rustic look as is, or add a coat of paint or stain for extra protection and style. This approach is perfect for a small, functional space.

The Classic Gable Shed: A Timeless Choice

A classic gable shed is a solid choice that offers a good amount of space and a visually appealing design. These require a bit more woodworking skill, but there are tons of plans available online. You'll be working with wood framing, sheathing, and roofing materials, so it's a great project for learning new skills. It’s worth the extra effort for a long lasting and well-protected shed.

The Charming Mini Greenhouse Shed: For the Plant Lover

If you love starting seeds and nurturing delicate plants, combine your potting shed with a mini-greenhouse! This involves incorporating clear polycarbonate panels into the shed's design, or even building a small greenhouse structure attached to a smaller potting shed. This option can increase your gardening space and will provide ideal conditions for your seedlings and plants.

Planning Your Potting Shed Project: A Step-by-Step Guide

Regardless of your chosen style, meticulous planning is crucial for a successful DIY project. Here's what you need to consider:

1. Design and Plans:

Start with a detailed sketch of your shed. Note dimensions, door placement, window placement (essential for good ventilation and light!), and any extra features like shelves or workbenches. You can find free shed plans online or purchase professionally designed plans for a more detailed guide.

2. Materials List:

Create a comprehensive list of all materials needed, including wood, screws, nails, paint, sealant, roofing felt, and any additional hardware. Shopping around for the best prices can save you some serious cash.

3. Tools and Equipment:

Make sure you have all the necessary tools. This could include saws (circular saw, hand saw), drills, measuring tools, levels, hammers, screwdrivers, safety glasses, and a sturdy work table. Don't underestimate the importance of having the right tools to make your work safer and easier.

4. Site Preparation:

Choose a level and well-drained location for your shed. Clear any vegetation and level the ground before you start building. You might even consider a concrete slab base for extra durability and to keep critters out.

Building Your Potting Shed: Let's Get Hands-On!

Now for the fun part! The actual building process will vary depending on your chosen design, but here are some general tips:

  • Start with the foundation: Whether it's a simple base of concrete blocks or a more elaborate concrete slab, a solid foundation is essential.
  • Frame the walls: Carefully cut and assemble the wall frames according to your plans. Use a level frequently to ensure everything is square and plumb.
  • Add sheathing: Attach sheathing to the wall frames to create a solid exterior. This could be plywood, OSB, or even reclaimed wood.
  • Install doors and windows: Make sure your doors and windows fit snugly and are properly sealed to prevent drafts and weather damage.
  • Build the roof: This can be a simple gable roof or a more complex design. Use appropriate roofing felt and materials to ensure watertightness.
  • Finish the interior: Add shelves, a workbench, and any other features you planned for your potting shed.
  • Painting and finishing: Once everything is in place, add a protective layer of paint or stain to protect your shed from the elements. Choose a color that complements your garden.

Adding Personal Touches to Your Potting Shed

Now for the truly fun part - personalize your shed! Add a chalkboard wall for jotting down gardening notes, install hooks for hanging tools, and include plenty of shelving for storing seeds, pots, and supplies. Consider adding a small window box for herbs or even a small seating area for relaxing amidst your greenery.

Commonly Asked Questions

Q: What's the best wood to use for a potting shed?

A: Pressure-treated lumber is ideal for its resistance to rot and insects. Cedar and redwood are also excellent choices, offering natural durability and a beautiful aesthetic.

Q: How much does it cost to build a DIY potting shed?

A: Costs vary greatly depending on the size and materials used. A simple pallet shed can cost under $100, while a more elaborate structure could cost several hundred dollars.

Q: How long does it take to build a potting shed?

A: This depends on your skill level and the complexity of the project. A simple shed might take a weekend, while a larger, more intricate one could take several weeks.

Q: Do I need planning permission to build a shed?

A: Regulations vary by location. Check with your local council to see if you need planning permission before you start building. Usually small sheds don't require permission, but it's always better to be safe than sorry.

And there you have it! Building your own potting shed is a rewarding project that combines creativity, skill, and a whole lot of love for gardening. Happy building, and happy gardening!

Continue reading

Rustic shed designs for small spaces

Maximize Your Minimal Space: Rustic Shed Designs for Small Yards

Dreaming of a charming rustic shed but worried about space constraints? Fear not! Small spaces don't have to mean sacrificing style or functionality. With clever design and thoughtful planning, you can seamlessly integrate a beautiful and practical rustic shed into even the tiniest backyard. This article explores delightful designs that maximize space and minimize footprint, allowing you to enjoy the benefits of extra storage and a captivating outdoor retreat.

Embrace the Charm of Compact Rustic Designs

Forget the oversized shed stereotype! Modern rustic design champions functionality within smaller footprints. Think vertical storage solutions, clever shelving systems, and multi-purpose interiors. A shed doesn't have to be just storage; it can also be a potting shed, a miniature workshop, or even a tranquil writing nook. Consider the vertical spaceâ€"high ceilings allow for lofted storage, freeing up valuable floor space. The key is to think "up," not just "out," when designing your compact rustic haven.

Choosing the Right Size and Shape

Careful consideration of dimensions is paramount for small spaces. A rectangular shed is often the most space-efficient, maximizing interior volume while minimizing the overall footprint. However, don't discount the charm of a slightly smaller, square shed, especially if it complements your existing garden aesthetic. Measure your available space meticulously before committing to a design. Remember to factor in walkway space around the shed for easy access and maneuverability.

Incorporating Rustic Design Elements

While size matters, the rustic aesthetic remains crucial. Achieve a charming rustic look with carefully chosen materials and details. Reclaimed wood offers unparalleled character and sustainability, bringing a sense of history and warmth to your design. Consider using cedar or redwood for their natural resistance to weathering. Complement the wood with a metal roof for a classic contrast, or opt for a matching wood shingle roof for a completely cohesive rustic vibe. Rustic hardware, like wrought iron hinges and handles, adds the perfect finishing touch.

Adding Character with Natural Touches

Enhance the rustic appeal by incorporating natural elements. A simple, well-placed window not only provides natural light but also connects the interior with the surrounding landscape. Consider adding a small, covered porch or even a simple trellis for climbing vines, seamlessly integrating the shed into the garden. These small details greatly elevate the aesthetic and create a truly inviting space.

Optimizing Space Inside Your Rustic Shed

Clever interior design is key to maximizing the limited space within a small shed. Built-in shelving provides efficient storage and helps to maintain a clean and organized feel. Utilize vertical space with lofted storage areas, accessible via a small ladder. Consider multi-functional furniture, such as a workbench that doubles as a work surface and storage unit. By carefully planning the layout, you can ensure that your compact shed is both practical and pleasing to the eye.

Smart Storage Solutions

Implementing smart storage solutions transforms a small space from cramped to comfortable. Utilize wall-mounted hooks for tools and garden equipment. Hanging storage baskets are perfect for smaller items. Label everything clearly to maximize efficiency and keep your shed organized. With a little ingenuity, you can create a truly efficient and visually appealing storage system.

By embracing compact designs, incorporating rustic elements, and strategically utilizing interior space, you can create a stunning and functional rustic shed, even in the smallest of yards. So, start planning your own charming retreat today!

Continue reading

How to choose the best shed plan as a beginner

Building Your Dream Shed: Choosing the Perfect Plan as a Beginner

Stepping into the world of shed construction can feel overwhelming. With countless plans available online and in stores, selecting the right one for your first project is crucial. This guide empowers you to confidently navigate the selection process, ensuring you choose a shed plan that perfectly matches your needs and skill level while setting you up for a successful build. Forget feeling lost; let's build your confidence and your shed!

Assessing Your Needs: Size, Style, and Function

Before you even glance at a single shed plan, take time to thoroughly consider your needs. Think about the primary purpose of your shed. Will it serve as a simple storage unit for garden tools? Or do you envision a more elaborate workshop complete with electricity and workbenches? This fundamental question dramatically influences your plan selection.

Determining the Right Size

Size matters! Carefully measure the space you have available. Consider not only the shed's footprint but also the necessary clearance for doors and access. Remember to account for future growth â€" it’s better to have a little extra space than to find yourself cramped later. A larger shed might seem like overkill initially, but it’s usually more cost-effective to build a slightly larger shed than to build another shed later.

Choosing the Perfect Style

Shed styles vary widely, from simple gable roofs to more complex designs with dormers or lofts. Browse images online for inspiration; consider how the style will complement your existing landscape. A saltbox shed might look beautiful in a rustic setting, while a modern A-frame might be a better fit for a contemporary property. Don't forget to consider the aesthetic of your surroundings when deciding on the style of your shed.

Defining Functionality

Think about the shed’s intended use: storage, workshop, or a combination of both? This dictates the necessary features. A workshop requires ample interior space, possibly electricity and even climate control. A storage shed may need additional shelving or specialized racking. Clearly defining your functionality is key to selecting a plan that addresses your specific requirements.

Analyzing Shed Plans: What to Look For

Once you have a clear understanding of your needs, start evaluating shed plans. Don't just look at pretty pictures â€" dig deeper into the plan's details. A good plan provides detailed instructions and precise measurements.

Detailed Drawings and Specifications

Ensure the plan provides comprehensive blueprints, including elevations, foundation details, and framing diagrams. Vague or unclear drawings are a recipe for frustration. Look for plans that offer multiple views and clearly labeled components. The clearer the plan, the easier the project will be to construct.

Material Lists and Cut Lists

A well-crafted plan includes a detailed materials list, specifying the type and quantity of lumber, hardware, and other materials needed. Furthermore, a cut list makes building your shed easier. This information helps with budgeting and ensures you purchase everything you need before you begin. This reduces costly interruptions and ensures a smoother building experience.

Construction Difficulty Level

Honestly assess your construction skills. Beginners should gravitate toward plans that are explicitly designed for novice builders. Look for plans with straightforward instructions and simpler designs. Don't underestimate the difficulty; choosing a plan you can manage will lead to a more rewarding experience.

Finding Reputable Shed Plan Sources

Not all shed plans are created equal. Source your plans from reputable suppliers who provide excellent customer support and offer detailed, accurate information.

Online Retailers and Plan Providers

Many websites specialize in offering digital shed plans. Read reviews and check testimonials before purchasing to ensure you're dealing with a trustworthy provider. Look for suppliers with a strong track record and positive customer feedback. This will save you headaches further down the line.

Local Lumber Yards and Home Improvement Stores

Your local home improvement store or lumber yard might offer shed plan packages or even provide custom design assistance. These local options often allow for more personalized service and can be a great resource for beginners. This personalized support can be invaluable during the building process.

Beyond the Plan: Preparation for Success

Choosing the right plan is only the first step. Preparing adequately before you begin construction is crucial. This includes acquiring the necessary tools, securing the proper permits, and gathering all the materials.

By following these steps, you'll equip yourself with the knowledge and confidence to select the perfect shed plan and embark on a successful building project. Remember that patience and planning are your greatest assets. Happy building!

Continue reading

Wednesday, January 22, 2025

Build a custom wooden pallet shed with detailed blueprints

Build Your Own Custom Wooden Pallet Shed: A Detailed Guide

Tired of overflowing storage? Dreaming of a charming, rustic addition to your backyard? Then build your own wooden pallet shed! This comprehensive guide provides detailed blueprints and instructions to craft a functional and aesthetically pleasing structure using reclaimed pallets. We'll walk you through every step, from material selection to the final touches, ensuring you build a shed you'll be proud of.

Planning and Design: Laying the Foundation for Success

Before you grab a hammer, careful planning is key. Determine the desired dimensions of your shed, considering the available space and your storage needs. Sketch a basic design, noting the placement of doors, windows (if desired), and shelving. Think about the overall styleâ€"will it be a simple, utilitarian structure or something more elaborate? This phase allows you to visualize the final product and tailor the design to your specific requirements. Remember to check local building codes and permits before starting construction.

Choosing the Right Pallets

Selecting the right pallets is crucial. Look for pallets made of sturdy, pressure-treated lumber in good condition. Avoid pallets showing significant damage, rot, or signs of pest infestation. Inspect each pallet carefully before incorporating it into your design. The size and type of pallets will influence the overall dimensions and design of your shed. Consider sourcing your pallets from local businesses or recycling centers for cost-effective and sustainable construction.

Materials and Tools: Gathering Your Arsenal

Once you've finalized your design, gather the necessary materials and tools. This includes, but is not limited to:

  • Reclaimed wooden pallets (quantity varies based on shed size)
  • Foundation materials: Concrete blocks, gravel, or a poured concrete slab (choose based on your budget and soil conditions)
  • Roofing materials: Tar paper, asphalt shingles, or corrugated metal roofing
  • Hardware: Screws, nails, hinges, door latch, and any necessary fasteners for securing the pallets and roofing
  • Wood Treatment: Exterior wood sealant or paint (optional, but recommended for weather protection)
  • Tools: Hammer, saw, drill, level, measuring tape, safety glasses, work gloves.

Construction: Building Your Pallet Shed Step-by-Step

This section outlines a general construction process. Specific steps may vary based on your unique design. Always prioritize safety and wear appropriate protective gear throughout the construction process.

Step 1: Foundation

Begin by preparing a level foundation. This could involve laying down gravel, setting concrete blocks, or pouring a concrete slab. The choice depends largely on your budget and the ground conditions. A level foundation ensures stability and prevents future problems.

Step 2: Pallet Assembly

Carefully disassemble any damaged pallets, and clean the usable ones. Start assembling the pallet walls. Securely fasten pallets together using screws and appropriate joinery techniques. Consider bracing the corners for extra strength. Remember to incorporate the door frame during this stage.

Step 3: Roof Construction

Once the walls are complete, construct the roof frame. This might involve using additional lumber to create a sturdy framework on top of the assembled pallet walls. Ensure the roof frame is adequately supported and level. Apply roofing felt followed by your chosen roofing material â€" shingles, metal, etc.

Step 4: Finishing Touches

Install the door and any windows, applying weather stripping to ensure a snug fit. Apply a weather sealant or paint to protect the wood from the elements and enhance the aesthetic appeal of your shed. Add shelves or other internal storage solutions as needed. Consider adding a lock for security.

Safety First!

Always wear safety glasses and work gloves throughout the construction process. Use caution when handling tools and materials. If you're unfamiliar with working with power tools, seek assistance from an experienced individual or consider hiring a professional for specific tasks.

Building your own wooden pallet shed is a rewarding project that combines creativity and practicality. By following this detailed guide, you can construct a durable and attractive storage solution that will serve you for years to come. Enjoy the process and the pride of creating something with your own two hands!

Continue reading

DIY pallet shed plans for your backyard or workshop

Build Your Dream Pallet Shed: A DIY Guide

Tired of cluttered garages and overflowing sheds? Yearning for extra storage space without breaking the bank? Then prepare to unleash your inner builder! This comprehensive guide walks you through constructing a charming and functional pallet shed, perfect for your backyard or workshop. We'll cover everything from sourcing materials to the final touches, transforming discarded pallets into a valuable addition to your property. Get ready to reclaim your space and build something amazing!

Gathering Your Supplies: The Foundation of Success

Before you even think about hammering a nail, meticulously plan your materials. This crucial step ensures a smooth construction process. You'll need a significant number of reclaimed pallets â€" aim for at least 20-30 depending on your desired shed size. Inspect each pallet carefully; choose sturdy ones free from significant rot or damage. Beyond pallets, your materials list includes:

  • Heavy-duty screws: Opt for exterior-grade screws to withstand the elements.
  • Pressure-treated lumber: This forms the base and supports the structure, providing crucial durability.
  • Metal roofing sheets or other durable roofing material: Protect your belongings from rain and sun.
  • Plywood or OSB sheeting: For additional wall strength and weatherproofing (optional).
  • Weather-resistant paint or sealant: Extend the life of your shed and personalize its appearance.
  • Leveling tools: Ensure a stable and secure foundation.
  • Post anchors: Securely fasten the base to the ground.
  • Safety equipment: Protect yourself with work gloves, safety glasses, and a sturdy work apron.

Constructing the Base: A Stable Beginning

A strong base is paramount for a long-lasting shed. Begin by preparing a level area in your chosen location. Use your leveling tools to ensure a perfectly flat surface. Next, lay down pressure-treated lumber, creating a robust frame. Securely fasten the lumber together using screws, creating a rectangle or square that matches your desired shed dimensions. Install post anchors to firmly secure the base to the ground, preventing shifting or settling. Consider adding concrete footings for extra stability in areas prone to frost heave.

Building the Walls: Raising the Structure

With the base complete, it's time to construct the walls. Start by carefully stacking and fastening the pallets vertically. Use your heavy-duty screws to create strong joints between pallets. For added strength and weather resistance, consider filling gaps between pallets with expanding foam sealant. You can also add plywood or OSB sheeting over the pallet walls for a cleaner, more finished look. Remember to leave space for a door opening. Carefully measure and cut the pallets accordingly, ensuring a secure and properly sized doorway. For added sturdiness, you can reinforce the pallet walls with additional horizontal supports.

Roofing and Finishing Touches: Bringing it All Together

With the walls standing tall, the next step involves creating a robust and weather-resistant roof. Attach the metal roofing sheets or your chosen roofing material securely to the top of the pallet walls. Overlap sheets to prevent leaks. After the roof is secured, consider adding a layer of waterproofing sealant to ensure complete protection from the elements. Finally, add your personal touch! Paint your shed a desirable color, add a door handle, and perhaps even a small window. Consider adding additional shelves or workbenches inside to customize your new storage space to your exact needs. Congratulations, you've built your own amazing pallet shed!

Continue reading

How to build a lean to shed with free downloadable plans

Build Your Own Lean-To Shed: A Step-by-Step Guide with Free Plans

Dreaming of extra storage space without breaking the bank? A lean-to shed is the perfect solution! This simple structure, attached to an existing building, offers a cost-effective way to expand your storage capacity. This guide provides a detailed walkthrough, combining practical advice with readily available free downloadable plans, empowering you to build your own lean-to shed. Get ready to transform unused space into a valuable asset!

Finding Free Lean-To Shed Plans

Before you grab your tools, you need a solid plan. Fortunately, numerous websites offer free lean-to shed plans. Search online using keywords like "free lean-to shed plans," "DIY lean-to shed blueprints," or "free shed plans PDF." Scrutinize the plans carefully before you start. Check the dimensions, materials list, and step-by-step instructions to ensure they align with your skill level and desired shed size. Consider factors like your available space and the overall aesthetic you want to achieve. Remember to download and print the plans for easy access during construction.

Gathering Your Materials and Tools

With your plans in hand, create a detailed materials list. This ensures you have everything you need before you begin, preventing frustrating delays. Most lean-to sheds require pressure-treated lumber for the frame, roofing materials (such as shingles or metal roofing), and fasteners like screws and nails. Remember to account for potential waste and buy slightly more than you initially calculate. Organize your tools as well. You’ll need basic carpentry tools, including a measuring tape, level, saw (circular saw recommended), drill, and hammer. A post hole digger is helpful if you're setting posts in the ground, and safety glasses and work gloves are essential for every step.

Essential Materials List (Example):

  • Pressure-treated lumber (4x4 posts, 2x4 framing)
  • Roofing material (shingles, metal, etc.)
  • Plywood or OSB sheathing for the roof
  • Building wrap
  • Concrete mix (for posts, if needed)
  • Nails, screws, and other fasteners
  • Exterior paint or stain (optional)

Constructing Your Lean-To Shed: A Step-by-Step Approach

Now comes the exciting part: the construction! Follow the downloadable plans precisely. Begin by preparing the base. This usually involves leveling the ground and potentially creating a concrete base or setting posts. Accurate measurements are critical throughout the entire process. Next, erect the frame, ensuring everything is plumb and square. Carefully attach the sheathing to the roof frame, and then install your chosen roofing material. Finally, add any finishing touches, like siding or paint, to personalize your new shed. Remember to take your time and double-check your work at each stage.

Safety First!

Throughout the building process, prioritize safety. Always wear appropriate safety gear, including safety glasses and work gloves. Use caution when operating power tools, and be mindful of potential hazards. If you're unsure about any step, consult a qualified professional. Building a shed is a rewarding experience, but safety should always be your top priority.

Enjoying Your New Shed

Congratulations! You’ve successfully built your own lean-to shed. Enjoy the satisfaction of a job well done and the added storage space. Remember to regularly maintain your shed to ensure its longevity. This includes checking for any damage and performing necessary repairs as needed. Your new shed will provide years of reliable service, offering a perfect space for tools, gardening supplies, or whatever else you need to store.

Continue reading

Wooden pallet shed construction ideas for affordable builds

Affordable Wooden Pallet Shed Construction: A Comprehensive Guide

The rising cost of traditional building materials has spurred a surge in interest in alternative construction methods, with repurposed materials taking center stage. Wooden pallets, readily available and often free or inexpensive, offer a compelling option for constructing affordable and functional sheds. This guide delves into the intricacies of building a pallet shed, emphasizing cost-effectiveness and practical considerations throughout the process.

Assessing Pallet Suitability and Acquisition

The foundation of any successful pallet shed project rests on securing high-quality pallets. Not all pallets are created equal. Avoid pallets that show signs of significant damage, such as extensive rot, insect infestation, or broken boards. The integrity of the pallets directly impacts the structural soundness and longevity of your shed.

Identifying Suitable Pallets

Prioritize pallets constructed from heat-treated lumber (marked with an HT stamp) or methyl bromide-free lumber (marked with an MB stamp). These markings indicate the pallets have undergone appropriate pest control treatments, mitigating potential risks. Avoid pallets marked with a "DB" stamp, signifying treatment with methyl bromide, a fumigant now largely restricted due to environmental concerns. Inspect each pallet carefully for signs of rot, warping, or damage before accepting them. Soundness is crucial for a robust structure.

Sourcing Pallets Ethically and Legally

While many businesses willingly dispose of pallets, it is crucial to obtain them legally and ethically. Contact local businesses directly â€" supermarkets, warehouses, and distribution centers â€" to inquire about their pallet disposal practices. Some may be happy to donate or sell them at a low cost. Always request permission before collecting pallets from private or public property to avoid legal issues.

Shed Design and Planning: Optimizing Space and Functionality

Before embarking on construction, meticulously plan your shed's dimensions and features. Consider the intended use â€" storage, workshop, or gardening shed â€" to determine the necessary internal space and any required specialized features. Simple designs are often more cost-effective and easier to construct.

Determining Shed Dimensions

The size of your pallet shed will be largely dictated by the number of pallets you have available and the desired functionality. Start by sketching out a basic design, considering the dimensions of standard pallets (typically around 48" x 40"). This will help you determine how many pallets you'll need for the walls, floor, and roof.

Incorporating Features and Modifications

While pallet sheds are inherently simple, you can incorporate various features to enhance their functionality. These may include: a simple door constructed from additional pallets or lumber; windows fashioned from repurposed materials or clear plastic sheeting; shelves crafted from additional pallet components or salvaged wood; and a reinforced floor constructed from plywood or OSB laid over a base of pallets.

Construction Phase: A Step-by-Step Guide

The construction process involves several key stages, demanding careful attention to detail to ensure stability and longevity. The foundation, walls, roof, and door each require specific considerations.

Foundation Construction

A robust foundation is critical for preventing ground moisture damage and ensuring the shed's stability. A simple concrete slab is ideal, but a compacted gravel base provides a cost-effective alternative. Ensure the base is level and adequately sized to support the shed's weight. If using pallets for the floor, place them directly on the leveled base.

Wall Construction

Construct the walls by securing the pallets vertically using screws or nails. Ensure the pallets are tightly fitted to maintain structural integrity. For added strength, consider using metal brackets or straps to reinforce joints. You may need to cut or modify pallets to fit specific wall sections. Remember to leave openings for doors and windows.

Roof Construction

The roof design depends on your preference and available resources. A simple gable roof is relatively straightforward to construct, utilizing additional pallets or salvaged lumber. Ensure proper roof pitch to facilitate water runoff. Consider using a waterproof membrane or roofing felt over the roof structure for added protection against the elements. Securely fasten the roof to the walls to resist wind uplift.

Door and Window Installation

Install the door and windows after the walls and roof are completed. For the door, you can utilize additional pallets or lumber, ensuring adequate strength and security. Consider adding hinges and a latch. Windows can be created using repurposed materials like plexiglass or clear plastic sheeting, framed with salvaged wood or additional pallet components.

Enhancing Durability and Aesthetics

While pallet sheds offer an affordable construction option, enhancing their durability and aesthetics can significantly prolong their lifespan and improve their overall appearance. Consider these enhancements to maximize your investment.

Applying Protective Treatments

Treat the pallets with a wood preservative to protect them from rot, insect infestation, and weathering. Apply a high-quality exterior-grade wood sealant or paint to enhance protection and improve the shed's aesthetics. Several coats are recommended for optimal protection.

Refinements and Finishing Touches

Add finishing touches to improve the shed's appearance and functionality. These could include adding weatherstripping around doors and windows to improve insulation and prevent drafts; installing shelving units for storage organization; and landscaping around the shed to integrate it seamlessly into the surrounding environment. A coat of exterior-grade paint can personalize the shed's look and protect the wood.

Conclusion: A Sustainable and Economical Solution

Constructing a shed from reclaimed wooden pallets provides a sustainable and economical alternative to traditional building methods. While it demands careful planning and execution, the process ultimately yields a functional and aesthetically pleasing structure at a fraction of the cost of conventional sheds. By following these guidelines and paying attention to detail, you can successfully create a durable and attractive pallet shed that meets your specific needs.

Continue reading

DIY wooden pallet shed plans for durable outdoor storage

Constructing a Durable Outdoor Storage Shed from Reclaimed Wooden Pallets

This comprehensive guide details the design and construction of a robust and aesthetically pleasing outdoor storage shed utilizing reclaimed wooden pallets. While seemingly a rudimentary material, pallets, when carefully selected and assembled, can provide a surprisingly durable and cost-effective solution for various storage needs. This project requires a moderate level of DIY skill and access to basic woodworking tools. The focus will be on creating a structure that withstands the elements while minimizing material waste and maximizing longevity.

Phase 1: Planning and Material Acquisition

The initial phase centers around meticulous planning and the careful selection of materials. The success of this project hinges on choosing high-quality pallets and accurately estimating the required quantity.

Selecting Suitable Pallets

Not all pallets are created equal. Prioritize heat-treated pallets marked with an IPPC stamp (HT or KD) as these are less likely to harbor pests. Avoid pallets exhibiting significant damage, such as severe rot, warping, or broken slats. Inspect each pallet carefully for loose nails or splinters. The ideal pallet will be constructed from sturdy hardwood, providing enhanced durability and weather resistance. Aim for pallets of consistent dimensions to simplify construction. Estimate the number of pallets needed based on the desired shed dimensions (detailed in subsequent sections).

Essential Tools and Materials

Before commencing construction, gather the necessary tools and materials. This comprehensive list ensures a smooth and efficient building process.

  • Reclaimed wooden pallets (quantity dependent on shed size)
  • Heavy-duty gloves
  • Safety glasses
  • Hammer
  • Crowbar or pry bar
  • Nail puller
  • Circular saw or hand saw
  • Measuring tape
  • Level
  • Drill with assorted drill bits
  • Screwdriver (both Phillips and flathead)
  • Wood screws (various lengths, exterior-grade)
  • Exterior-grade wood glue
  • Pressure-treated lumber for the base and framing (optional, but recommended for increased durability)
  • Metal roofing sheets or other suitable roofing material
  • Post anchors (if constructing on concrete)
  • Ground screws or concrete footings (if constructing on soil)
  • Weatherproof sealant or paint (optional, for added protection)

Phase 2: Shed Foundation and Base Construction

A solid foundation is crucial for the longevity and stability of the shed. The choice of foundation depends on the ground conditions and the weight of the finished structure.

Preparing the Site

Clear the designated area of any debris, vegetation, or uneven ground. Level the ground thoroughly using a shovel and rake to ensure a stable base. Mark the dimensions of the shed base using string and stakes. This will serve as a guide during the construction phase. For a more permanent installation on softer ground, consider using concrete footings or ground screws at each corner of the shed.

Constructing the Base Frame

The base frame provides support for the pallet walls and floor. Using pressure-treated lumber, construct a rectangular frame with dimensions corresponding to your desired shed size. Ensure the frame is perfectly level using a level and adjust as needed. Secure the frame using exterior-grade screws and wood glue for added strength. This frame will act as the foundation upon which the pallets will be built.

Phase 3: Pallet Wall Construction

This phase involves meticulously assembling the pallet walls. Careful planning and precision are essential to ensure structural integrity.

Preparing the Pallets

Remove any loose nails, splinters, or protruding hardware from the pallets. Inspect each pallet for any signs of damage or decay, and discard any unsuitable pallets. Clean the pallets thoroughly using a brush and remove any dirt or debris. You may choose to sand down rough edges for a smoother finish, although this is optional. If desired, apply a protective sealant or paint at this stage for added weather resistance.

Assembling the Walls

Attach the pallets vertically to the base frame, ensuring they are flush and tightly fitted. Use a combination of exterior-grade screws and wood glue to secure each pallet to the base frame and to each other. For additional strength, consider using metal brackets or plates at the corners and other critical joints. Ensure the walls are plumb (vertically aligned) throughout the construction process. Construct each wall separately before attaching them to the base frame.

Adding Doorways and Windows

Plan the placement of doorways and windows during the wall construction phase. Remove sections of pallets to create openings. Reinforce the openings with additional framing lumber to maintain structural integrity. You may use purchased doors or construct your own from pallets for a more cohesive aesthetic. Window openings can be covered with plexiglass or other suitable transparent material.

Phase 4: Roofing and Finishing Touches

The roofing and finishing touches complete the shed, providing weather protection and an aesthetically pleasing result. Careful attention to detail in this phase ensures a robust and durable structure.

Roofing Installation

Select a suitable roofing material that is resistant to the elements. Metal roofing sheets are a popular and durable choice. Construct a roof frame using pressure-treated lumber, ensuring the correct angle for water runoff. Attach the roofing material securely to the frame, ensuring a watertight seal. Consider adding flashing around chimneys or other protrusions for extra weather protection.

Finishing and Refinements

Once the roof is completed, apply a weatherproof sealant to all joints and seams to prevent water penetration. This step is crucial for the longevity of the shed. If desired, you may add a coat of exterior-grade paint or stain to enhance the appearance and provide added protection. Consider adding a locking mechanism to the door for security purposes. Finally, clear the surrounding area of any debris and ensure the shed is level and stable.

Conclusion

Constructing a wooden pallet shed provides a cost-effective and environmentally friendly alternative to purchasing pre-fabricated storage solutions. This comprehensive guide provides a step-by-step approach to constructing a durable and weather-resistant shed. Remember to always prioritize safety by using appropriate safety gear and following proper woodworking techniques. With careful planning and execution, your reclaimed pallet shed will serve as a reliable and aesthetically pleasing addition to your outdoor space for years to come. Remember to always adapt the plans to your specific needs and available materials, ensuring a structure tailored to your unique requirements.

Continue reading

Build a pallet shed with free step-by-step instructions

Build Your Own Pallet Shed: A Step-by-Step Guide

Dreaming of a charming, functional shed without breaking the bank? This guide shows you how to construct a sturdy pallet shed using readily available materials. Forget expensive lumber and complicated blueprints; we'll transform repurposed pallets into a practical storage solution. Get ready to unleash your inner builder and create something amazing!

Gathering Your Materials

Before you begin, gather your materials. This project relies heavily on reclaimed pallets, so start your search at construction sites, recycling centers, or even ask local businesses if they have any they're discarding. Inspect each pallet carefully; choose sturdy ones free of rot, significant damage, or embedded nails that pose a safety hazard. You'll need at least 10-15 pallets depending on your desired shed size. Beyond the pallets, you'll need:

  • Heavy-duty screws (at least 3 inches long)
  • A drill with appropriate drill bits
  • A hammer
  • Measuring tape
  • Level
  • Safety glasses
  • Work gloves
  • Optional: Roofing materials (tar paper, corrugated metal, or recycled plastic sheeting)
  • Optional: Paint or sealant to weatherproof the structure

Step 1: Preparing the Pallets

Clean your collected pallets thoroughly. Remove any loose nails, debris, or sharp protrusions. Use a pry bar or hammer to carefully remove any protruding nails. Safety is paramount, so always wear safety glasses and work gloves during this process. Once cleaned, inspect each pallet again for structural integrity. You might need to reinforce weak areas with additional screws or bracing depending on the pallet's condition.

Disassembling and Reconfiguring

Depending on the size and shape you desire for your shed, you may need to partially disassemble some pallets. Carefully remove some boards from certain pallets to create the desired wall and roof sections. Remember to keep the strongest planks for structural integrity. This step requires patience and careful planning. Consider sketching a simple design beforehand to visualize the layout and avoid unnecessary waste.

Step 2: Constructing the Frame

Begin building the shed's frame by creating a base using several pallets laid side-by-side. Securely fasten them together using long screws. Ensure the base is level and stable. Next, construct the walls using more pallets, connecting them to the base with screws. Create the corners by precisely aligning and screwing together the pallets. For increased strength, add vertical supports between pallets using additional reclaimed lumber or sturdy branches.

Step 3: Building the Roof

The roof is crucial for protecting your stored items. Depending on the size of your shed and the available pallets, you might need to create a gabled or a simple shed roof. For a simple shed roof, lay the pallets at an angle, ensuring proper overlap for water runoff. Securely attach the roof pallets to the supporting wall pallets using long screws. Remember to ensure adequate overhang to protect the walls from rain.

Step 4: Finishing Touches

Once the main structure is complete, it’s time for finishing touches. You may want to consider adding a simple door using more reclaimed pallets or purchased lumber. You can also add a small window for ventilation. To protect your shed from the elements, apply a weatherproofing sealant or paint the pallets with a durable exterior paint. Consider adding a layer of roofing material over the pallets for added protection from the weather.

Enjoy Your New Pallet Shed!

Congratulations! You've successfully built your own pallet shed. This project demonstrates the power of repurposing materials and creating something useful and visually appealing from discarded items. Now, enjoy your new storage space, and admire the fruits of your labor!

Continue reading

Build a wooden pallet shed with detailed plans for beginners

Building Your Own Pallet Shed: A Beginner's Guide

Hey there, folks! So you're thinking about building a shed, huh? That's awesome! And even better, you want to do it using reclaimed wooden pallets â€" super eco-friendly and budget-friendly! This guide will walk you through the process, step-by-step, in a way that even a complete beginner can understand. Don't worry if you've never picked up a hammer before â€" we'll get through this together.

1. Planning and Preparation: Laying the Groundwork

Before we even think about hammering a single nail, we need a plan. Think of this like baking a cake â€" you wouldn't just throw ingredients together, would you? This stage is crucial for a successful shed build.

1.1 Choosing Your Pallets

First things first: the pallets! You'll need to source them. Check with local businesses â€" construction sites, warehouses, and even grocery stores often have pallets they're happy to give away. Just be sure to ask permission first! When choosing, look for pallets that are:
  • Sturdy and intact: Avoid pallets with broken boards or significant damage.
  • Heat-treated (HT): Look for the HT stamp. This means they've been treated with heat, not harmful chemicals.
  • Similar in size: Aim for pallets that are roughly the same dimensions for easier construction.

1.2 Choosing Your Location and Size

Where will your magnificent pallet shed reside? Consider things like:
  • Accessibility: Do you have easy access for delivery and construction?
  • Sunlight and drainage: A level spot with good drainage is ideal.
  • Local regulations: Check with your local council for any building regulations or permits required.
Decide on the desired size of your shed. A smaller shed is easier to build for a beginner. Sketch a simple plan on paper â€" it doesn't have to be perfect, just enough to give you a general idea.

1.3 Gathering Your Tools and Materials

You'll need a few essential tools and materials. Don't worry, you probably already have some of these lying around!
  • Hammer
  • Screwdriver (or drill/driver)
  • Measuring tape
  • Level
  • Safety glasses (VERY important!)
  • Work gloves
  • Shovel (for ground preparation)
  • Nails or screws (galvanized are best for outdoor use)
  • Wooden posts or concrete blocks (for the base)
  • Optional: Plywood or other sheeting for walls or roof if you want a more weatherproof shed.
  • Optional: Paint or stain to protect the wood.

2. Building the Foundation: A Solid Start

A solid foundation is key to a sturdy shed. We'll keep it simple here.

2.1 Preparing the Ground

Clear the area where your shed will sit, removing any grass, weeds, and rocks. Level the ground as much as possible. You can use a shovel to even out any bumps or dips.

2.2 Creating the Base

You have a couple of options for the base:
  • Concrete Blocks: Arrange concrete blocks in a rectangle according to the size of your shed, creating a level base.
  • Wooden Posts: Dig holes in the corners and place sturdy wooden posts, ensuring they're level and firmly in the ground. You can fill the holes with concrete for extra stability.

3. Constructing the Walls and Roof: Bringing it Together

Now for the fun part â€" assembling the walls and roof!

3.1 Building the Walls

This is where your reclaimed pallets come into play. You’ll likely need to disassemble some pallets to get the right length of wood. Carefully remove the nails or screws, and then you can start assembling the walls. Lay the pallets vertically, securing them together using nails or screws. Remember to check the levels as you go! You might need to use some additional wood to fill in gaps or create a more structurally sound wall.

3.2 Assembling the Roof

For a simple shed, a single-sloped roof works best. Use pallets to build a frame, supporting the roof structure. You'll likely need to cut some pallets to fit and to create a slope for drainage. Cover the roof with plywood or additional pallets for weather protection. If using pallets on the roof, ensure they’re overlapped and secured well to prevent leaks.

4. Finishing Touches: The Home Stretch

You're almost there! A few finishing touches will make all the difference.

4.1 Adding a Door

You'll need a door! You can either source a repurposed door or build one from pallets and plywood. Hang it using hinges. Add a latch or lock for security.

4.2 Weatherproofing and Aesthetics

Apply a coat of paint or stain to protect the wood from the elements and enhance its appearance. This will significantly increase the lifespan of your shed. You can also add things like a small window to brighten up the interior.

5. Safety First!

Remember, safety is paramount. Always wear safety glasses and work gloves. If you're using power tools, make sure you know how to use them properly and follow all safety instructions. Take breaks when needed and don't rush the process.

Commonly Asked Questions

Q: How long does it take to build a pallet shed?

A: This depends on your experience level and the size of the shed. For a beginner, expect to spend several days, possibly a week or more, working on it in your spare time.

Q: How much does it cost to build a pallet shed?

A: The beauty of using pallets is that it’s very inexpensive! Your main costs will be the tools (if you don't already have them), nails or screws, and any additional materials like plywood for the roof or walls.

Q: Are pallet sheds durable?

A: With proper construction and weatherproofing, a pallet shed can be surprisingly durable. Remember to use sturdy pallets, secure all joints well, and add a protective coating.

Q: What if I don't have any experience in building?

A: That's totally okay! This guide is designed for beginners. Take your time, follow the steps carefully, and don't be afraid to ask for help if you get stuck. There are also tons of helpful videos online that you can consult for visual guidance.

Q: Can I use treated pallets?

A: It's best to use heat-treated (HT) pallets, as chemically treated pallets may contain harmful substances. Always check the markings on the pallets before using them.

And there you have it! Building a pallet shed is a rewarding project. It might seem daunting at first, but with a little planning and patience, you’ll have a fantastic, eco-friendly shed in no time! Remember to have fun and enjoy the process. Let me know if you have any other questions!
Continue reading

Saturday, January 18, 2025

Effortless step-by-step shed building for beginners

Build Your Dream Shed: A Beginner's Guide to Effortless Construction

Building a shed might seem daunting, but with a clear plan and the right approach, you can construct a sturdy and functional storage space with ease. This guide breaks down the process into manageable steps, perfect for beginners. Forget complicated jargon and confusing diagrams; let's build your shed together!

Planning Your Shed: Laying the Foundation for Success

Before you even touch a tool, meticulous planning is crucial. Start by determining your shed's purpose. Will it house gardening equipment, store tools, or serve as a workshop? This dictates its size and features. Next, measure your available space and check local building codes and regulations â€" you might need permits. Sketch a simple design, including dimensions, door placement, and any windows. Consider the materials: wood is classic and versatile, while metal offers durability and low maintenance. Finally, create a detailed materials list â€" this prevents costly mid-project trips to the hardware store!

Essential Planning Steps:

  • Determine shed purpose and size.
  • Check local building codes and obtain necessary permits (if required).
  • Sketch a simple design and choose your materials (wood, metal, etc.).
  • Create a comprehensive materials list.

Building the Foundation: A Solid Base for Your Shed

A strong foundation is paramount. The simplest option for beginners is a concrete slab. Dig a level area slightly larger than your shed's footprint, ensuring proper drainage. Lay down a layer of gravel for better compaction and drainage. Then, construct your formwork using plywood or pressure-treated lumber. Mix and pour the concrete, using a level to ensure a perfectly flat surface. Allow sufficient curing time, usually a few days, before proceeding. Alternatively, consider using pressure-treated lumber for a more budget-friendly and quicker base, but remember proper ground preparation is essential to prevent rot.

Framing the Walls and Roof: Constructing the Shed's Structure

With your foundation set, it's time to frame the walls. Use pressure-treated lumber for the base plates, which rest directly on the foundation. Cut and assemble the wall studs according to your design, ensuring they are plumb and square. Attach the top plates to complete the wall frames. For the roof, construct rafters, ensuring proper slope for water runoff. Use strong connectors to join the rafters to the top plates. Consider adding trusses for added support, especially for larger sheds. Remember to regularly check your measurements and maintain squareness throughout the framing process â€" accurate framing simplifies the next steps.

Sheathing and Roofing: Protecting Your Investment

Once the frame is complete, sheathe the walls with plywood or OSB (Oriented Strand Board). This provides a solid surface for siding and adds structural integrity. Install the roofing material according to the manufacturer's instructions. Asphalt shingles are a popular and cost-effective choice, offering good weather protection. Remember to use proper underlayment to prevent leaks. Pay close attention to roof overhangs and ensure proper ventilation to prevent moisture buildup. Take your time with the roofing process; a properly installed roof is essential for the longevity of your shed.

Finishing Touches: Adding the Door and Siding

Install the shed's door, ensuring it hangs correctly and latches securely. Add your chosen siding â€" vinyl, wood, or metal â€" to complete the exterior. Remember to use appropriate fasteners for your chosen materials. Finally, apply a weather-resistant sealant around windows, doors, and other areas susceptible to leaks. Consider adding trim for a polished look. Enjoy your new shed!

Remember: Safety first! Wear appropriate safety gear throughout the entire process, including safety glasses, gloves, and sturdy work boots. If you're unsure about any aspect of the construction, consult a qualified professional.

Continue reading

Innovative outdoor shed project ideas

Innovative Outdoor Shed Project Ideas: Reimagining Utility and Aesthetics

The humble shed, often relegated to the background of a property, presents a significant opportunity for creative expression and functional enhancement. Moving beyond the simple storage unit, innovative shed designs are emerging, blurring the lines between utility and architectural artistry. This article explores a range of ambitious and inspiring outdoor shed projects, emphasizing sustainability, adaptability, and aesthetic integration with the surrounding landscape.

Integrating Sheds into the Landscape: Beyond Mere Storage

The traditional notion of a shed as an isolated structure is undergoing a transformation. Contemporary designs prioritize seamless integration with the surrounding environment. This can be achieved through various architectural and landscaping strategies.

Camouflaging the Shed: Mimicking Natural Elements

One approach involves camouflaging the shed to blend seamlessly with its surroundings. This might entail using natural materials like reclaimed wood, stone, or even living walls of climbing plants to cover the shed's exterior. The color palette should echo the tones of the landscape, using earthy browns, greens, and grays to minimize visual impact. Strategic planting around the shed can further enhance this camouflage effect, creating a natural buffer and softening the structure's presence.

Elevated Sheds and Decking Integration

Elevating the shed on a deck creates a multi-functional space. The deck can serve as an outdoor patio or entertaining area, extending living space beyond the confines of the house. This approach adds architectural interest and improves accessibility, particularly if the shed is intended for activities requiring easy entry and exit, such as gardening or equipment storage.

Shed as a Focal Point: Architectural Statement

Conversely, a shed can be designed as a striking architectural feature, drawing the eye and enhancing the overall aesthetic appeal of the property. This involves using bold materials, unconventional shapes, and striking color schemes. The shed becomes an element of intentional design, rather than an afterthought.

Functional Innovations: Maximizing Shed Utility

Beyond aesthetic considerations, innovative shed designs focus on enhancing functionality and maximizing space efficiency. This involves incorporating smart storage solutions, adaptable layouts, and sustainable technologies.

Multi-Functional Shed Designs: Workshop, Studio, and More

The shed can evolve from a simple storage space into a versatile workshop, art studio, home office, or even a guest house. Careful planning of the interior layout is crucial, ensuring adequate space for specific activities. This might involve incorporating built-in workbenches, shelving systems, and specialized storage solutions tailored to the intended use.

Sustainable Shed Construction: Eco-Friendly Materials and Technologies

Sustainable practices are increasingly integrated into shed construction. This includes using reclaimed or recycled materials, such as reclaimed wood or repurposed shipping containers, minimizing the environmental impact. Incorporating energy-efficient features like solar panels or rainwater harvesting systems further enhances sustainability. Proper insulation can also reduce energy consumption for heating or cooling, depending on the intended use.

Smart Shed Technology: Automation and Connectivity

Integrating smart technology enhances both functionality and convenience. This might include automated lighting systems, remote access control, and environmental monitoring sensors. Smart features can provide remote access to the shed's contents, allowing for inventory management and security enhancements. Such technology contributes to improved safety and efficiency.

Aesthetic Enhancements: Elevating Shed Design

The aesthetic appeal of a shed can be significantly enhanced through careful consideration of materials, colors, and architectural details.

Material Selection: Exploring Diverse Options

The choice of materials significantly impacts the shed's aesthetic. Reclaimed wood offers a rustic charm, while metal provides a modern, industrial look. Stone adds a touch of permanence and natural beauty. The selection should be guided by both aesthetic preferences and the overall style of the property.

  • Reclaimed Wood: Offers a rustic and environmentally friendly option.
  • Metal: Provides a modern and durable alternative.
  • Stone: Creates a robust and natural appearance.
  • Composite Materials: Offer low-maintenance and weather-resistant solutions.
  • Color Schemes and Finishes: Creating Visual Harmony

    The color palette should complement the surrounding environment and the overall style of the property. Earthy tones blend seamlessly with nature, while brighter colors create a bolder statement. The finish, whether stained, painted, or left natural, also contributes to the shed's aesthetic appeal.

    Architectural Details: Adding Character and Charm

    Incorporating architectural details, such as dormers, gables, or decorative trim, can elevate the shed's aesthetic appeal. These details can add character and visual interest, enhancing the overall design. Careful attention to these finer points distinguishes a simple storage shed from a carefully crafted architectural element.

    Beyond the Basics: Specialized Shed Designs

    The versatility of shed designs extends to specialized applications, tailored to specific needs and preferences.

    The Chicken Coop Shed: Integrating Animal Housing

    Integrating a chicken coop into the shed design provides a convenient and aesthetically pleasing solution for backyard poultry farming. This involves designing dedicated space within the shed for the chickens, with features like nesting boxes, roosting bars, and secure access points.

    The Greenhouse Shed: Cultivating Indoor Plants

    Combining a shed with a greenhouse creates a space for year-round gardening. This requires careful consideration of materials, insulation, and ventilation to create a suitable environment for plant growth. This approach expands gardening possibilities and extends the growing season.

    The Play Shed: A Dedicated Space for Children

    Designing a dedicated play shed provides a safe and stimulating space for children to play and explore. This could involve incorporating climbing walls, slides, or other play equipment within the shed's structure. Such a design offers a dedicated space for children's activities while keeping the play area separate from the main living areas.

    In conclusion, the possibilities for innovative outdoor shed projects are vast and varied. By embracing creative design principles, sustainable practices, and smart technology, homeowners can transform the humble shed into a valuable asset that enhances both the functionality and aesthetic appeal of their property. The key lies in carefully considering the intended use, integrating the shed into the landscape, and meticulously selecting materials and finishes to create a unique and personalized structure.

    Continue reading

    Friday, January 17, 2025

    Outdoor shed plans for every yard

    Outdoor Shed Plans for Every Yard: A Comprehensive Guide

    The addition of an outdoor shed can significantly enhance the functionality and aesthetic appeal of any property. From providing essential storage space to serving as a dedicated workshop or even a tranquil retreat, a well-designed shed offers a multitude of benefits. However, selecting and constructing the appropriate shed requires careful consideration of various factors, including yard size, style preferences, and intended use. This comprehensive guide explores diverse shed plans suitable for a wide array of yards, encompassing detailed considerations for design, construction, and maintenance.

    Assessing Your Yard and Needs: The Foundation of Shed Planning

    Before embarking on the journey of shed construction, a thorough assessment of your yard and its specific characteristics is paramount. This involves analyzing several key aspects to ensure the chosen shed plan aligns seamlessly with your property and individual requirements.

    Yard Dimensions and Topography

    Accurate measurements are fundamental. Determine the available space, taking into account existing landscaping, utilities, and access points. Note any variations in terrain, such as slopes or uneven ground, which might necessitate adjustments to the foundation design. Consider the proximity to boundaries and any local regulations pertaining to shed placement.

    Intended Use and Storage Requirements

    The purpose of your shed dictates its design. A simple storage shed for gardening tools requires less space and complexity than a workshop demanding ample bench space and electrical outlets. Consider the size and quantity of items to be stored; this directly influences the shed’s internal dimensions. For workshops, consider the size and type of machinery or tools that will be housed within.

    Aesthetic Considerations and Style Integration

    Your shed should complement the overall aesthetic of your property. Consider the architectural style of your home and surrounding structures. Choose materials and finishes that blend harmoniously, ensuring the shed enhances rather than detracts from the landscape’s visual appeal. Explore various architectural styles, from rustic to modern, to find the best fit for your property.

    Budgetary Constraints and Material Selection

    Establish a realistic budget before beginning the project. The cost of materials and labor varies significantly based on size, design, and materials chosen. Compare the cost-effectiveness of different materials like wood, metal, or vinyl, factoring in durability, maintenance requirements, and aesthetic preferences. Explore options such as repurposed or reclaimed materials to achieve cost savings.

    Exploring Diverse Shed Plans for Varied Yards

    The following sections present a diverse range of shed plans catering to different yard sizes, needs, and aesthetic preferences.

    Small Yard Shed Plans: Maximizing Limited Space

    For smaller yards, maximizing vertical space and utilizing clever design features is crucial. Consider a compact shed with a gable roof to maximize headroom and a lean-to design to minimize footprint. A multi-functional shed, incorporating features like vertical shelving and wall-mounted storage, can enhance storage capacity without compromising on space.

    • Lean-to Sheds: These space-saving designs are ideal for narrow yards or areas adjacent to existing structures. They offer simplicity in construction and are relatively inexpensive.
    • Vertical Storage Sheds: These maximize vertical space with tall shelving units and lofted areas, perfect for storing seasonal items or infrequently used tools.
    • Multi-functional Sheds: Combining storage with a small workspace or potting bench creates a highly efficient use of limited space.

    Medium Yard Shed Plans: Balancing Size and Functionality

    Medium-sized yards provide more flexibility in shed design. Consider a larger shed with additional features like windows for natural light, a workbench, or even a small loft for extra storage. A gable roof provides ample headroom and a more visually appealing aesthetic.

    • Gable Roof Sheds: Offer superior headroom and a classic look. This design is well-suited for varied sizes and allows for easy ventilation.
    • Saltbox Sheds: Feature an asymmetrical roof design with a longer, sloped section at the back, offering additional storage space while maintaining a compact front profile.
    • A-Frame Sheds: Offer a visually distinct appeal with a simple construction and relatively easy assembly.

    Large Yard Shed Plans: Embracing Grand Designs

    Large yards offer the opportunity to create a more substantial shed, possibly incorporating multiple rooms or dedicated zones. Consider a detached workshop with ample workbenches, electrical outlets, and climate control. A garden shed with a potting bench and storage for fertilizers and tools is another option.

    • Multi-Room Sheds: Incorporate separate areas for storage, workshop activities, and potentially even a small office space.
    • Gambrel Roof Sheds: Provide ample interior space and a striking visual appeal with a distinctive curved roofline.
    • Barn-Style Sheds: Offer a rustic aesthetic with a large footprint and ample storage capacity. The design lends itself well to customization.

    Construction Considerations and Best Practices

    Regardless of the chosen shed plan, adhering to sound construction practices is paramount to ensure longevity and structural integrity. This includes proper foundation preparation, appropriate material selection, and meticulous attention to detail during assembly.

    Foundation Selection and Preparation

    The foundation type depends on the shed's size, weight, and soil conditions. Options include concrete slabs, gravel bases, and pier foundations. Proper leveling and drainage are essential to prevent settling and water damage.

    Material Selection and Quality

    Choose high-quality materials appropriate for the climate and intended use. Pressure-treated lumber resists rot and insect damage, while metal sheds offer superior durability and minimal maintenance. Consider the impact of weather conditions on material selection.

    Construction Techniques and Safety Precautions

    Follow the provided plans meticulously. Use appropriate tools and safety equipment throughout the construction process. Ensure proper fastening techniques to prevent structural failure.

    Maintenance and Longevity: Ensuring Your Shed's Lifespan

    Regular maintenance is key to extending the lifespan of your outdoor shed. This includes inspecting the structure for damage, repainting or restaining as needed, and addressing any issues promptly. Protecting the shed from the elements with appropriate sealant or weatherproofing is crucial in maintaining its integrity.

    In conclusion, selecting and constructing an outdoor shed involves a careful consideration of various factors. By carefully assessing your yard's characteristics, understanding your needs, and selecting an appropriate design, you can create a valuable addition to your property, enhancing both functionality and aesthetic appeal for years to come.

    Continue reading
     

    Designs Queensland Copyright © 2016 | Powered by Blogger