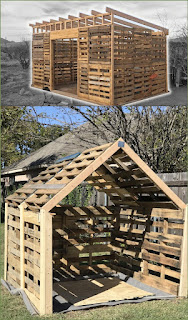
Constructing a Durable Outdoor Storage Shed from Reclaimed Wooden Pallets
This comprehensive guide details the design and construction of a robust and aesthetically pleasing outdoor storage shed utilizing reclaimed wooden pallets. While seemingly a rudimentary material, pallets, when carefully selected and assembled, can provide a surprisingly durable and cost-effective solution for various storage needs. This project requires a moderate level of DIY skill and access to basic woodworking tools. The focus will be on creating a structure that withstands the elements while minimizing material waste and maximizing longevity.
Phase 1: Planning and Material Acquisition
The initial phase centers around meticulous planning and the careful selection of materials. The success of this project hinges on choosing high-quality pallets and accurately estimating the required quantity.
Selecting Suitable Pallets
Not all pallets are created equal. Prioritize heat-treated pallets marked with an IPPC stamp (HT or KD) as these are less likely to harbor pests. Avoid pallets exhibiting significant damage, such as severe rot, warping, or broken slats. Inspect each pallet carefully for loose nails or splinters. The ideal pallet will be constructed from sturdy hardwood, providing enhanced durability and weather resistance. Aim for pallets of consistent dimensions to simplify construction. Estimate the number of pallets needed based on the desired shed dimensions (detailed in subsequent sections).
Essential Tools and Materials
Before commencing construction, gather the necessary tools and materials. This comprehensive list ensures a smooth and efficient building process.
- Reclaimed wooden pallets (quantity dependent on shed size)
- Heavy-duty gloves
- Safety glasses
- Hammer
- Crowbar or pry bar
- Nail puller
- Circular saw or hand saw
- Measuring tape
- Level
- Drill with assorted drill bits
- Screwdriver (both Phillips and flathead)
- Wood screws (various lengths, exterior-grade)
- Exterior-grade wood glue
- Pressure-treated lumber for the base and framing (optional, but recommended for increased durability)
- Metal roofing sheets or other suitable roofing material
- Post anchors (if constructing on concrete)
- Ground screws or concrete footings (if constructing on soil)
- Weatherproof sealant or paint (optional, for added protection)
Phase 2: Shed Foundation and Base Construction
A solid foundation is crucial for the longevity and stability of the shed. The choice of foundation depends on the ground conditions and the weight of the finished structure.
Preparing the Site
Clear the designated area of any debris, vegetation, or uneven ground. Level the ground thoroughly using a shovel and rake to ensure a stable base. Mark the dimensions of the shed base using string and stakes. This will serve as a guide during the construction phase. For a more permanent installation on softer ground, consider using concrete footings or ground screws at each corner of the shed.
Constructing the Base Frame
The base frame provides support for the pallet walls and floor. Using pressure-treated lumber, construct a rectangular frame with dimensions corresponding to your desired shed size. Ensure the frame is perfectly level using a level and adjust as needed. Secure the frame using exterior-grade screws and wood glue for added strength. This frame will act as the foundation upon which the pallets will be built.
Phase 3: Pallet Wall Construction
This phase involves meticulously assembling the pallet walls. Careful planning and precision are essential to ensure structural integrity.
Preparing the Pallets
Remove any loose nails, splinters, or protruding hardware from the pallets. Inspect each pallet for any signs of damage or decay, and discard any unsuitable pallets. Clean the pallets thoroughly using a brush and remove any dirt or debris. You may choose to sand down rough edges for a smoother finish, although this is optional. If desired, apply a protective sealant or paint at this stage for added weather resistance.
Assembling the Walls
Attach the pallets vertically to the base frame, ensuring they are flush and tightly fitted. Use a combination of exterior-grade screws and wood glue to secure each pallet to the base frame and to each other. For additional strength, consider using metal brackets or plates at the corners and other critical joints. Ensure the walls are plumb (vertically aligned) throughout the construction process. Construct each wall separately before attaching them to the base frame.
Adding Doorways and Windows
Plan the placement of doorways and windows during the wall construction phase. Remove sections of pallets to create openings. Reinforce the openings with additional framing lumber to maintain structural integrity. You may use purchased doors or construct your own from pallets for a more cohesive aesthetic. Window openings can be covered with plexiglass or other suitable transparent material.
Phase 4: Roofing and Finishing Touches
The roofing and finishing touches complete the shed, providing weather protection and an aesthetically pleasing result. Careful attention to detail in this phase ensures a robust and durable structure.
Roofing Installation
Select a suitable roofing material that is resistant to the elements. Metal roofing sheets are a popular and durable choice. Construct a roof frame using pressure-treated lumber, ensuring the correct angle for water runoff. Attach the roofing material securely to the frame, ensuring a watertight seal. Consider adding flashing around chimneys or other protrusions for extra weather protection.
Finishing and Refinements
Once the roof is completed, apply a weatherproof sealant to all joints and seams to prevent water penetration. This step is crucial for the longevity of the shed. If desired, you may add a coat of exterior-grade paint or stain to enhance the appearance and provide added protection. Consider adding a locking mechanism to the door for security purposes. Finally, clear the surrounding area of any debris and ensure the shed is level and stable.
Conclusion
Constructing a wooden pallet shed provides a cost-effective and environmentally friendly alternative to purchasing pre-fabricated storage solutions. This comprehensive guide provides a step-by-step approach to constructing a durable and weather-resistant shed. Remember to always prioritize safety by using appropriate safety gear and following proper woodworking techniques. With careful planning and execution, your reclaimed pallet shed will serve as a reliable and aesthetically pleasing addition to your outdoor space for years to come. Remember to always adapt the plans to your specific needs and available materials, ensuring a structure tailored to your unique requirements.
0 comments:
Post a Comment